
A Supplier is a company or an individual who provides you with products or services.
In ERPNext, the Supplier master stores the supplier's details, defaults and settings that are used across all purchase transactions like Request for Quotation, Purchase Order, Purchase Receipt, Purchase Invoice and Payment Entry.
To access the Supplier list, go to: Home > Buying > Setup > Supplier
1. How to Create a Supplier
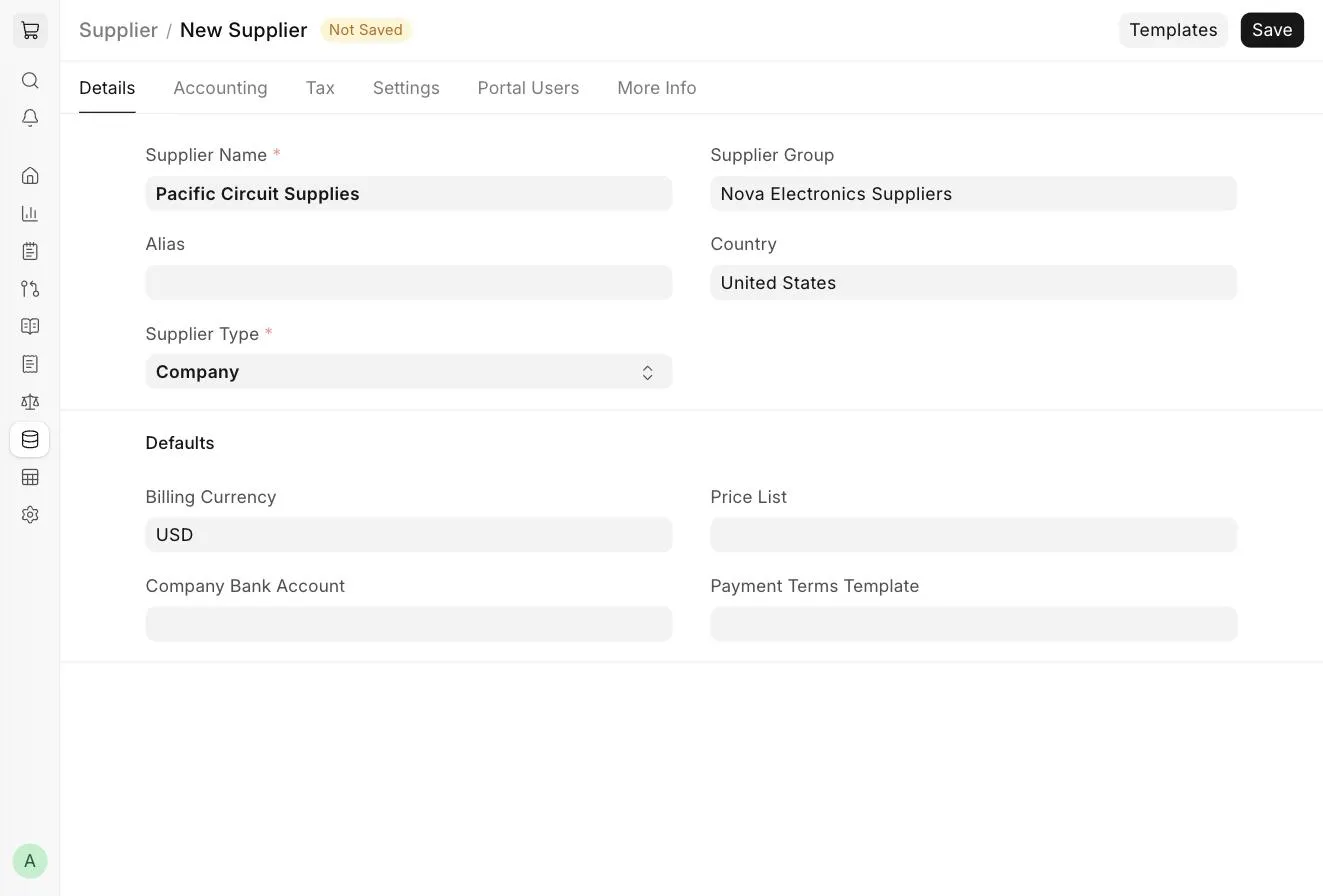
- Go to the Supplier list and click on Add Supplier .
- Enter the Supplier Name .
- Optionally, enter an Alias , i.e. an alternate or short name by which the supplier is also known.
- Select the Supplier Type : Company, Individual or Partnership. If you select Individual, a Gender field will be shown.
- Select the Supplier Group , for example, Hardware, Raw Material or Services.
- Select the Country of the supplier.
- Save.
:::note By default, a Supplier is named by its Supplier Name. To name suppliers using a Naming Series or Auto Name instead, change the Supplier Naming By option in Buying Settings . :::
2. Features
The Supplier form is organized into the following tabs: Details , Address & Contact , Accounting , Tax , Settings , Portal Users , More Info and Connections . The Address & Contact and Connections tabs are available once the Supplier is saved.
2.1 Defaults
The Defaults section is available in the Details tab. Values set here are automatically fetched in future purchase transactions for this supplier.
- Billing Currency : Your supplier's currency can be different from your company currency. For example, if you set EUR for a supplier, purchase transactions for this supplier will be created in EUR, and the exchange rate will be fetched.
- Price List : The default buying Price List for this supplier. When you select this supplier in a purchase transaction, the associated Price List will be fetched, and item rates will be picked from its Item Prices. You can view prices in Buying > Item Price .
- Company Bank Account : The default bank account to be used for transactions with this supplier.
- Payment Terms Template : If a Payment Terms Template is set here, it will be automatically selected in future purchase transactions.
2.2 Address and Contacts
Addresses and Contacts in ERPNext are stored separately, so you can create multiple Addresses and Contacts for one Supplier. Once the Supplier is saved, go to the Address & Contact tab and click on New Address or New Contact to add them.
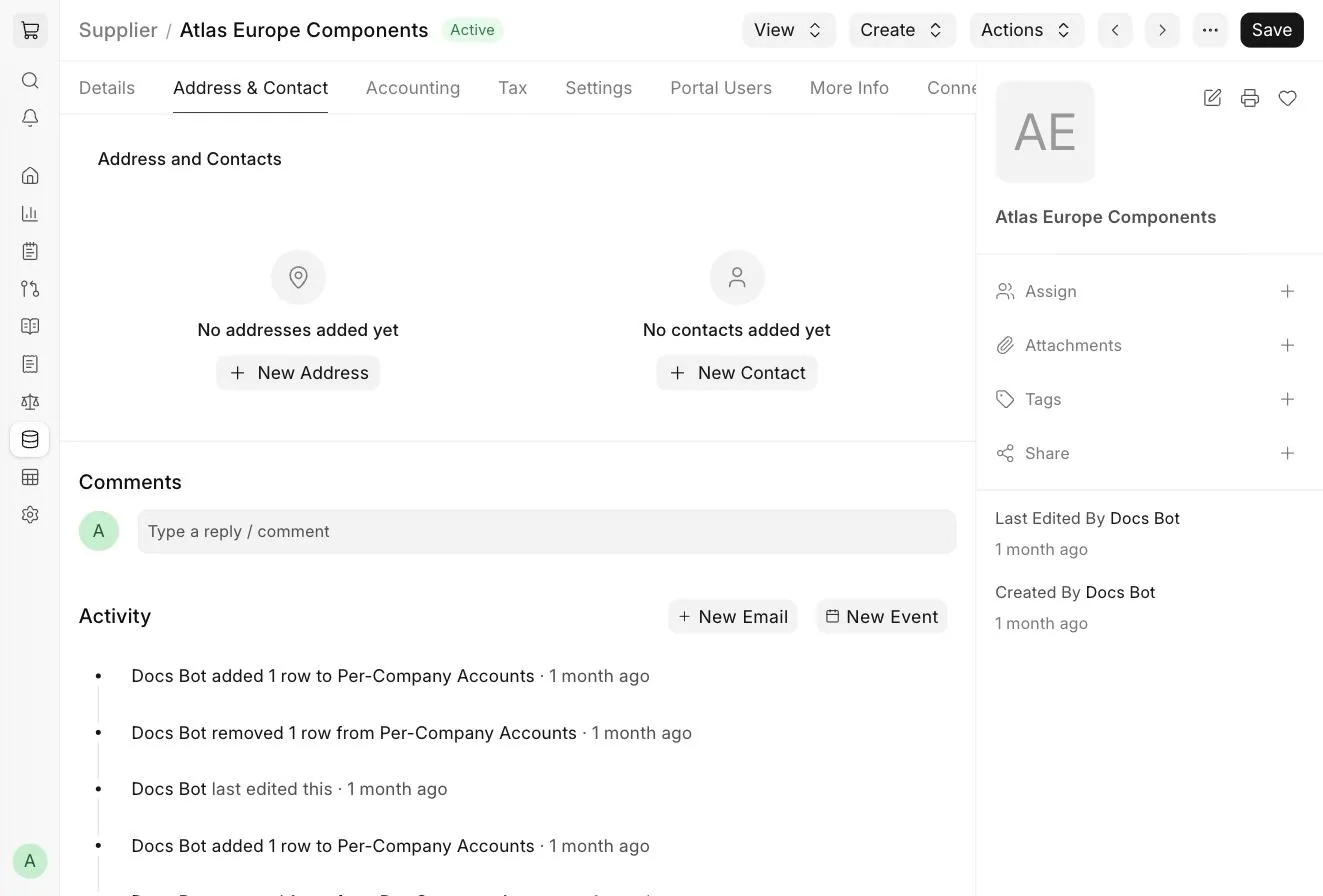
You can also set the Primary Address and Primary Contact for the Supplier from this tab.
:::tip When you select a Supplier in any transaction, the Contact for which the "Is Primary Contact" field is checked will be fetched along with the Supplier details. :::
2.3 Accounting
Default Accounts
For all Suppliers, the Default Payable Account set in the Company master (usually "Creditors") is used. When a Purchase Invoice is created, the payable amount towards the supplier is booked against this account.
If you want to use a different payable or advance account for a Supplier, add a row in the Per-Company Accounts table and select the Company , Default Account and Advance Account . You can add one row per company. If left blank, the default accounts from the respective Company will be used.
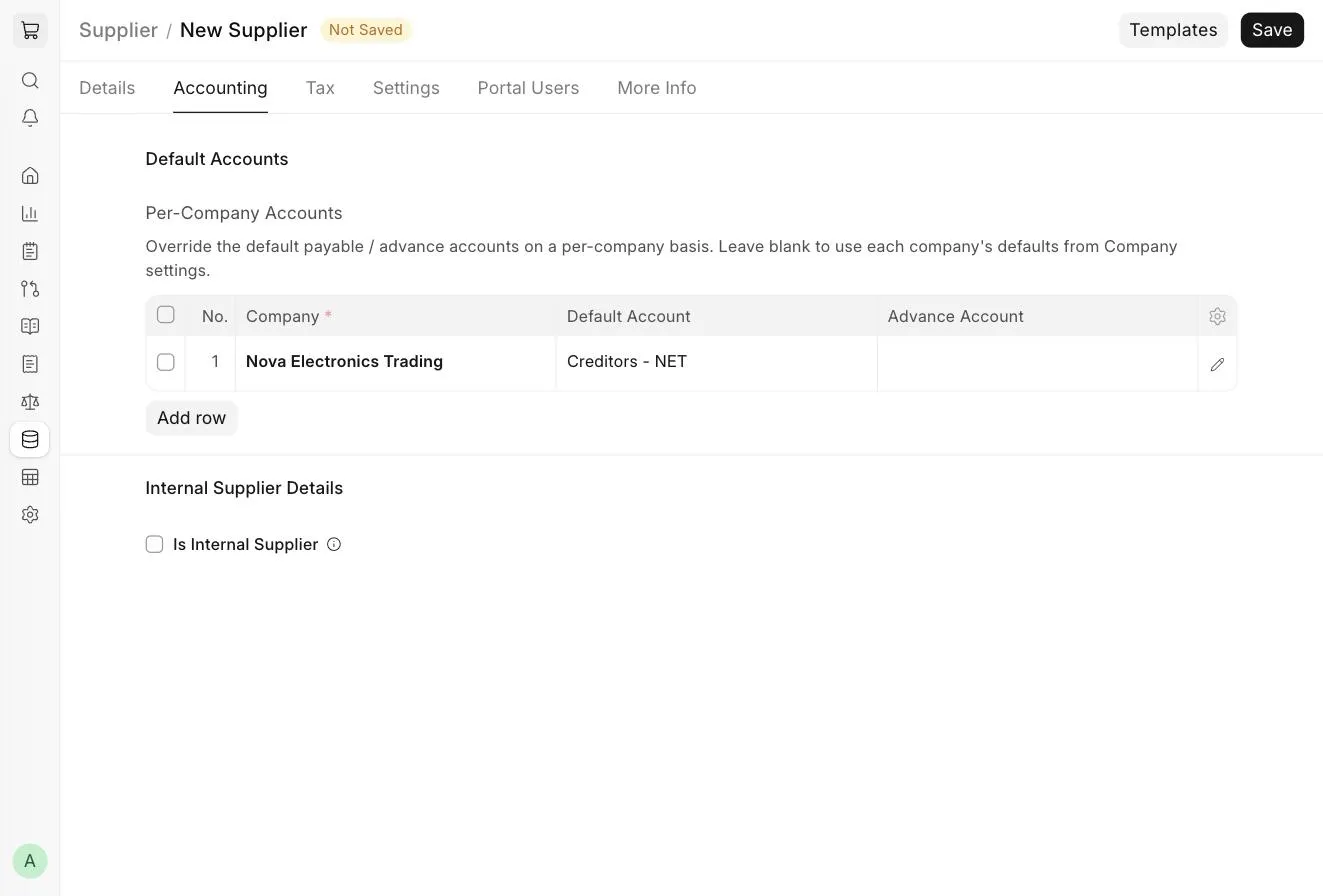
:::note Before selecting a custom payable account here, make sure that the account is created in the Chart of Accounts with the Account Type set to Payable. :::
One Supplier can be used across multiple companies. In this case, you can define company-wise accounts for the Supplier by adding multiple rows in this table.
Internal Supplier Details
If the supplier is a sister, parent or child company, check Is Internal Supplier and select the company it represents in the Represents Company field. In the Allowed to transact with table, select the companies that can transact with this internal supplier. This is used for inter-company transactions.
2.4 Tax
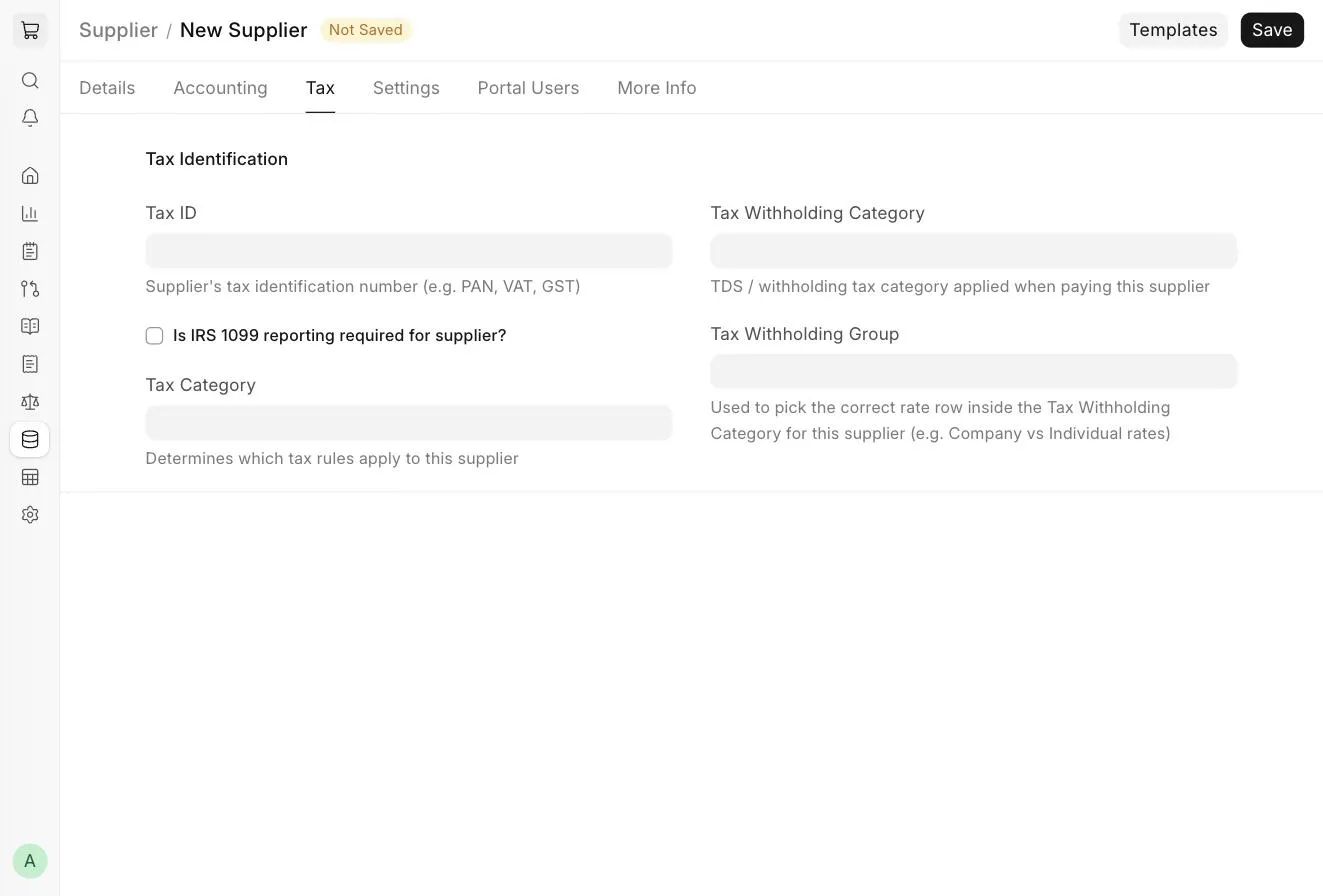
- Tax ID : Tax identification number of the supplier, for example, PAN, VAT or GST number.
- Is IRS 1099 reporting required for supplier? : For the US, check this if the supplier needs to be included in IRS 1099 reporting.
- Tax Category : This is linked to the Tax Rule. If a Tax Category is set here, the Purchase Taxes and Charges Template linked to the matching Tax Rule will be applied when you select this supplier. Tax Categories can be used to group suppliers to whom the same taxes apply, for example, Government, Commercial, etc.
- Tax Withholding Category : The TDS or withholding tax category applied when paying this supplier. On setting a category here, it will be fetched into the Purchase Invoice and Payment Entry. For more information, visit the Tax Withholding Category page.
- Tax Withholding Group : Used to pick the correct rate row within the Tax Withholding Category for this supplier, for example, Company vs Individual rates.
:::note For India, fields like GST Category, GSTIN and PAN are added to the Supplier form by the India Compliance app. :::
2.5 Settings
- Is Transporter : Check this if the supplier provides you with transport services. The supplier can then be selected as a transporter in Delivery Notes and Stock Entries.
- Allow purchase invoice creation without purchase order : If "Is Purchase Order required for Purchase Invoice & Receipt creation?" is set to "Yes" in Buying Settings, you can override it for this supplier by checking this option.
- Allow purchase invoice creation without purchase receipt : If "Is Purchase Receipt required for Purchase Invoice creation?" is set to "Yes" in Buying Settings, you can override it for this supplier by checking this option.
- Disabled : Disabled suppliers are hidden from selection in new transactions but remain in historical records.
- Is Frozen : Frozen suppliers block new transactions and ledger entries until unfrozen. Only users with the role set in the Company's "Roles Allowed to Set and Edit Frozen Account Entries" field can transact with a frozen supplier. This is useful when the supplier's name or bank details are being amended.
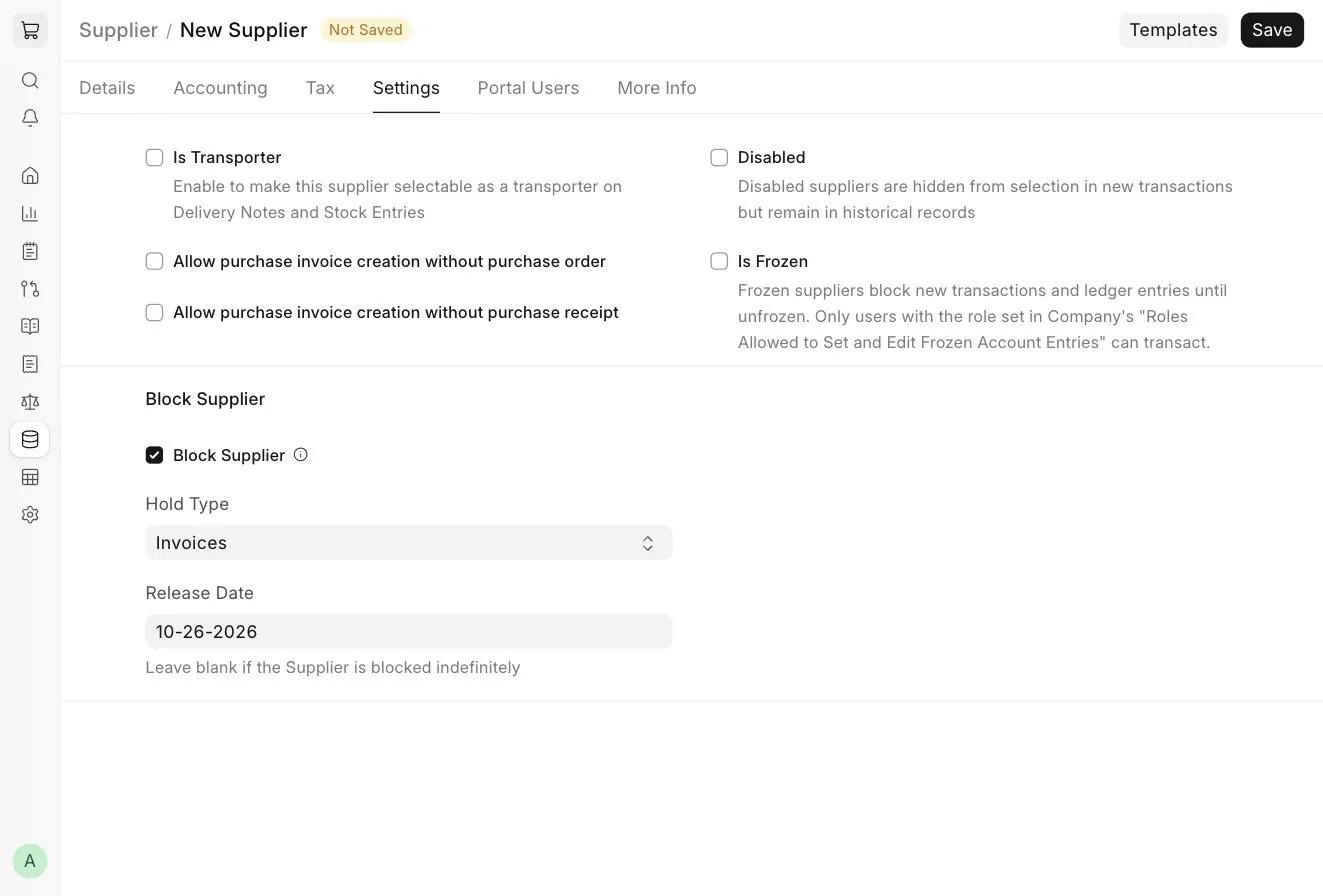
Block Supplier
You can block invoices, payments or both for a supplier till a specific date. Check Block Supplier and select the Hold Type . When a supplier is blocked, its status will be shown as "On Hold".
- All : Both the hold types below will be applied.
- Invoices : ERPNext will not allow Purchase Invoices or Purchase Orders to be created for the supplier.
- Payments : ERPNext will not allow Payment Entries to be created for the supplier.
Set a Release Date to automatically release the hold on that date. If you do not set a Release Date, the supplier will be blocked indefinitely.
:::note The Supplier can also be restricted to transact only with specific companies using the Restrict to Companies option in the Company Restrictions section. This section is visible only to users with the required permissions. :::
2.6 Portal Users
In the Portal Users tab, you can add users who can log in to the Supplier Portal on behalf of this supplier, for example, to view Requests for Quotation and submit quotations.
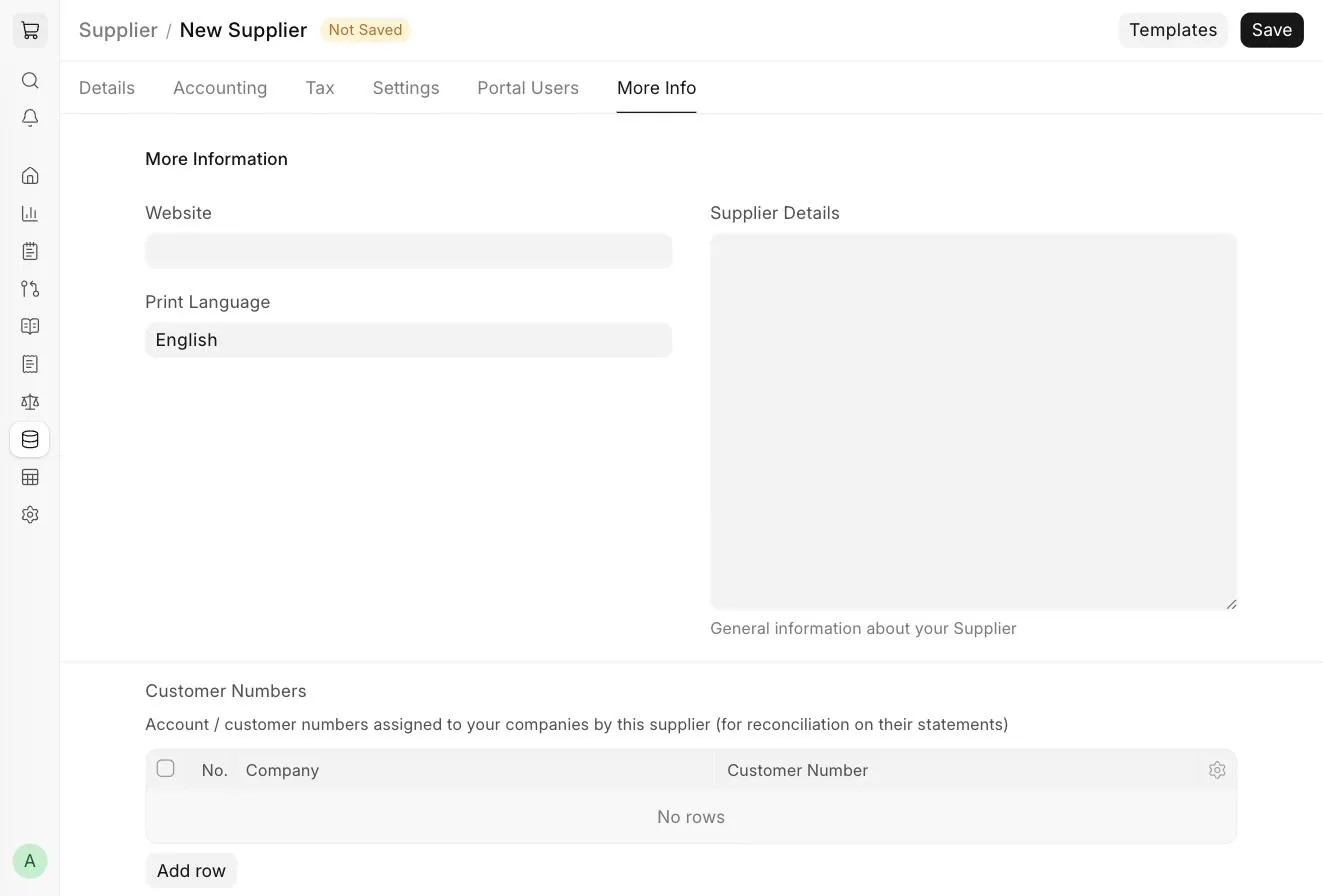
2.7 More Information
- Website : The supplier's website.
- Print Language : The language in which documents for this supplier will be printed.
- Supplier Details : Any general information about the supplier.
- Customer Numbers : The account or customer numbers assigned to your companies by this supplier. This helps with reconciliation against the supplier's statements.
2.8 After Saving
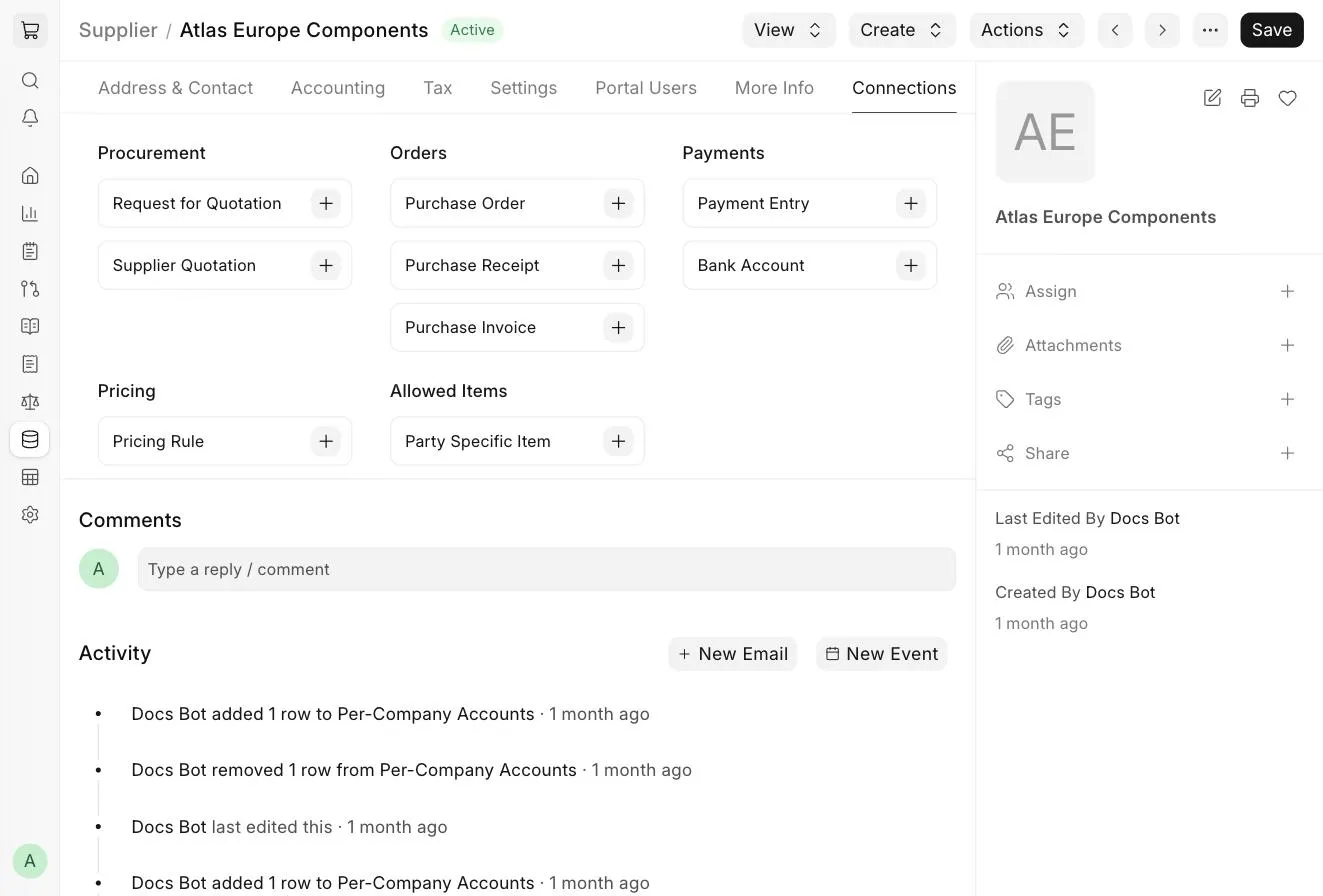
Once the Supplier is saved, the Connections tab shows all the documents linked with the supplier, grouped as follows:
- Procurement : Request for Quotation and Supplier Quotation.
- Orders : Purchase Order, Purchase Receipt and Purchase Invoice.
- Payments : Payment Entry and Bank Account.
- Pricing : Pricing Rules linked with this supplier.
- Allowed Items : Party Specific Items, i.e. items that are allowed to be purchased from this supplier.
The following options are also available at the top of the form:
- View : Open the Accounting Ledger or Accounts Payable report for this supplier.
- Create : Create a Purchase Order, Purchase Invoice, Request for Quotation, Supplier Quotation, Bank Account or Pricing Rule for this supplier.
- Actions > Get Supplier Group Details : Fetch the default accounts and payment terms set in the Supplier Group.
- Actions > Link with Customer : Link this supplier with an existing Customer, if the same party is both your supplier and customer.
:::note If a Supplier Scorecard is set up for the supplier, ERPNext can warn or prevent the creation of Requests for Quotation and Purchase Orders based on the supplier's scorecard standing. :::
3. Related Topics
- Supplier Group
- Supplier Quotation
- Supplier Scorecard
- Maintaining Supplier's Item Code in the Item Master
Frequently Asked Questions
1. How to add multiple addresses for a supplier?
You can link multiple addresses (such as billing, shipping, warehouse or office locations) to a single supplier using the Address doctype.
Steps
- Go to Buying > Setup > Supplier and open the supplier.
- Go to the Address & Contact tab and click on New Address .
- Fill in the address details like Address Title (for example, ABC Suppliers - Mumbai Warehouse), Address Line 1 & 2, City, State and Country.
- Optionally, check Preferred Billing Address or Preferred Shipping Address as required.
- In the Links table, verify that the Link Document Type is "Supplier" and the Link Name is the supplier's name.
- Save.
Repeat these steps to add as many addresses as needed.
Using Supplier Addresses
When creating documents such as a Purchase Order or Purchase Invoice, you can select the appropriate supplier address. ERPNext uses the selected address for printing and applies the relevant regional information, such as taxes, where applicable.